
Background
This write up is a long time coming, but after a couple of people asked me technical questions, I am finally getting around to writing something on these singing skeleton heads! Most everything I’ve created to this point has been Christmas related, but we’ve been trying to up our Halloween game a little since our yard is getting a bit full during the Christmas season. This prop is in honor of my late Uncle Walter and his great Polka band, Skippy and the Boys. Originally, I started with just the main skull head, but it felt a little boring, so I decided to add in some backup singers as well (Joe, Stush, and Rosie; all siblings of Uncle Walter).
Skippy
Skippy started off with a Monster Guts’s 3-axis skull kit (which they sadly don’t appear to sell anymore). It is a pretty nice kit that essentially included everything except the motors. I had wanted to design the mounting plate and armature setup myself, but I am glad I went with a kit as it saved a lot of time in trial-and-error. For the skull, I went with the ever popular Lindberg Skull. I bought a new old stock (NOS) unit, and the kit fit perfect within it. Even once you get it all assembled it can take a lot of tweaking to get all of the motions moving smoothly and to not bind.
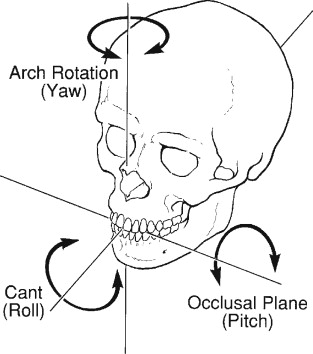 The reason it is a 3-axis skull is because it has movement in 3 different directions: yaw, pitch, and roll (see the image on the left). The three main motions are done via standard sized servo motors. A servo is a digital motor that can be rotated to a particular location by varying a digital pulse-width to it (called pulse-width modulation, or PWM). By changing the pulse-width, you are able to change the location of the servo’s shaft (the servos I bought have ~180° of motion).
The Hardware
Even though I bought a 3-axis kit, that is just the setup to mount the servos to, it doesn’t actually control any of the motors or play any audio. In addition to the skulls and the 3-axis hardware setup, I needed eight more main parts to complete the project:
- Arduino Nano (the brains of the operation, and my reining favorite microcontroller)
- HiLetgo PCA9685 16 Channel 12-Bit PWM Servo Motor Driver (can control up to 16 servos at once)
- DFPlayer Mini MP3 Player (Arduino compatible, micro SD card based, MP3 player for audio playback)
- SD card storage (to store the seven servo movement playbacks during songs onto a large SD card)
- Three large servos (control Skippy’s 3-axis movement)
- Four smaller servos (for the 4 jaws)
- A homemade joystick setup to animate the skull/jaws
- An old computer speaker
Two Stages of Software
This project can basically be split into two parts: 1) recording the motions to the audio clips, and 2) playing back the motions with the audio. To begin with, I created about 16 snippets of songs that I wanted to use; things like Werewolves of London, I want Candy, Monster Mash, some jokes my kids told, etc. I then used the free, and very user friendly Audacity application to take the MP3s I had and strip them down to 15 – 20s in length each.
I put the MP3 snippets onto a uSD card and inserted it onto the DFPlayer board. This little board is //fairly// easy to work with, but took some time for me to get comfortable with. To simplify things, I went with audio file names of 0001.mp3 – 0015.mp3. These equated to the songs (the first song is a recording of my Uncle):
const char song1[] PROGMEM = "1 - In Heaven There Is No beer";
const char song2[] PROGMEM = "2 - Skel Dance Joke";
const char song3[] PROGMEM = "3 - Oogie Boogie Man";
const char song4[] PROGMEM = "4 - Funny Bone Joke";
const char song5[] PROGMEM = "5 - The Time Warp";
const char song6[] PROGMEM = "6 - Lying Ghost Joke";
const char song7[] PROGMEM = "7 - Monster Mash";
const char song8[] PROGMEM = "8 - Ice Scream Joke";
const char song9[] PROGMEM = "9 - The Addams Family";
const char song10[] PROGMEM = "a - Skel Cross Road Joke";
const char song11[] PROGMEM = "b - Werewolves of London";
const char song12[] PROGMEM = "c - Ghostbusters";
const char song13[] PROGMEM = "d - Purple People Eaters";
const char song14[] PROGMEM = "e - I Put a Spell on You";
const char song15[] PROGMEM = "f - I Want Candy";
A standard SD card goes into the expanded storage board to record all of the various servo motions. The motions will be played back at the same time the audio is played to look like everything is in sync. The trick to getting things in sync is to know how many servo movements are needed for each song. To do that, I need to initialize a movement file for each song so that I can later go back and fill in all the various servo values. In the menuing system I designed, I choose to init a file for a particular song and it just stubs out the file with “neutral” servo positions for all seven servos.
Once a file has been initialized, I can go back and start recording the individual movements within the file. I can also re-record just certain movements if I liked most of a recording, but not all. Just make sure to not re-init a song that you have already finished working on or you will lose everything. Backup your files from the SD card often!!
To animate Skippy’s skull, I made a homemade controller with a knob that can control the X and Y axis as well as be able to rotate in the yaw orientation (you have to look specifically for knobs that can rotate). I connected the knob breakout wires to the Arduino via some small PCB terminal blocks so I could disconnect it when I was done. For the jaw I tried a few different things, but settled on a 10K Ohm Slide Potentiometer that I wired up to the Arduino the same way as the knob. Now I had a knob that could be used to control the head, and a sliding potentiometer to make the various jaws open and close.

All of the various inputs are are connected to analog-to-digital convertors (aka A2D or ADC) on the Arduino. An ADC takes a voltage reading on a pin of the Arduino and converts it to a digital value. In the Arduino, I take that digital value and convert that to the movement needed by the servo. When in recording mode, this is happening in real-time.
Menuing
To get my Arduino to perform double duty (record the show as well as play it back), I have the menuing system come up asking what the user would like to do; the options are to “read” or “write”, but I also allow a button push (more on that later). No matter if you choose to read or write, the menu will then ask you which audio clip that you want to perform the action on (see my list above). After that it wants to know which movement you want to record/playback (as well as if you want to init a movement file or replay all movements):
const char menu_title2[] PROGMEM = "Which servo are you reading/writing?";
const char head[] PROGMEM = "1 - Skippy's Head";
const char jaw_1[] PROGMEM = "2 - Skippy's Jaw";
const char jaw_2[] PROGMEM = "3 - Joe's Jaw";
const char jaw_3[] PROGMEM = "4 - Stush's Jaw";
const char jaw_4 [] PROGMEM = "5 - Rosie's Jaw";
const char jaw_2_3[] PROGMEM = "6 - Joe and Stush's Jaw";
const char jaw_2_3_4 [] PROGMEM = "7 - All Jaws";
const char init_file [] PROGMEM = "8 - Init a file (if w); play all (if r)";
It looks like a lot of different options, but really, what I wanted to be able to do was to have the backup singers (Joe, Stush, and Rosie) all be in sync most of the time, or to be able to use them individually depending what I was doing. This cut down on programming when one recording of the backup singers could cover all of the motions.
If you are playing back (reading), the audio will start playing out of the speaker, and the particular motion you chose will play back. If you chose to write a file, the music will start to play, and the Arduino will start to record the respective movement via its ADC pin.
The Show
As I mentioned before, I actually have a button also connected up to the Arduino, in this case a doorbell (since it is mostly OK to be outdoors). Even though upon boot the menu will appear, in normal practice there won’t be anything connected to monitor that output, and the Arduino will just sit idling. While idling though, if it detects that the doorbell was pressed, it will look at a particular address on the Arduino’s EEPROM (internal storage on the Arduino) to see what the last song that was played from the list. It will then play the next audio clip in the list and move the servos based on the movements recorded to the associated movement file. Once completed, it will write that file number to the EEPROM for next time someone presses the button. In this way it will cycle through all the songs and jokes, one at a time, on each button push.
The Backup Singers
I went through many types of skulls before I found the ones I wanted to use for this project. I initially started with the cheap skulls you could get from Home Depot, but I wasn’t happy with their movement. After bouncing around some, I settled on a set of resin skulls from CostumePub.com. In particular, I went with their hard resin human skull with movable jaw version (though I didn’t pay anywhere near the current price they have listed on there as of 6/2023). These jaws are very sturdy (since they are resin and not plastic), and have very fluid jaw movements. I mounted the skulls to pieces of 2×2 that then get mounted to the display. I have the jaws set to close automatically by attaching a spring from the head to the jaw itself. Then a servo gets attached from the 2×2 to the jaw via a small rod with a ball joint on the end. Now when the servo is off, the default position will be with the jaw closed (due to the spring). This seems to work pretty well and I haven’t had any issues with them.


Wrapping It All Up
There are a lot of moving pieces to this project (yeah, pun intended), but it is fairly straightforward. There is an Arduino Nano at the heart of it all, an Arduino controlled MP3 board that plays back the audio out of a speaker, an Arduino controlled SD card for external storage to record the servo movements, a homemade controller with a slide to control the jaws, four skulls, seven servos, and a doorbell. All of the pieces taken individually are fairly simple and easy to comprehend, but when you put them all together it is one of my favorite projects that I’ve made so far, and kids love listening/watching the skulls sing and banter. There are two main pieces of Arduino code that I will pass along: the main .ino file here, and a header file that I created to go along with it here. Enjoy and happy haunting!
Videos
Photos