TooZ Family sELFie Station
A vacation that turned into a holiday-based Raspberry Pi photo booth.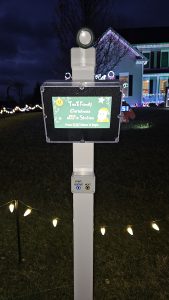
Background
This one started on a summer road trip to The Inn at Christmas Place hotel in Pigeon Forge, TN (which, if you haven’t been, is exactly as awesome as it sounds). They had a selfie station in the lobby that was constantly drawing kids in to take a custom photo with an overlaid elf hat (my kids included). We snapped a pic, and Michelle looked at me and said “we need one;” and the project went straight onto the never-ending TODO list. But unlike some of the other projects, this one started to take shape before the vacation even ended!
From the outside the idea looks simple: walk up, press a button, get a photo with a Santa hat or witch hat on your head, scan a QR code, and you’re done. The execution is where it gets interesting.
I started with PiBooth, an open-source photo booth framework built for the Raspberry Pi. It worked, and it got me maybe 70% of the way there. But the last 30% is where things started to fall apart. Plugins didn’t quite behave the way I needed, timing between capture and display felt off, and every new feature I wanted to add meant working around the framework instead of building on top of it.
This turned into one of those projects where I kept saying “I’ll just tweak this one thing,” and then a week later I was rewriting everything from scratch.
This is that rewrite. It’s doing a lot more than I was originally planning for, but that’s kind of how these builds go.


Goals
Rather than copying the hotel’s approach directly, we wanted something that fit our display, could handle cold outdoor evenings, didn’t require anyone to navigate a touchscreen, and let people get their photos easily. That narrowed it down to a short list of must-haves:
- One-button, family-proof operation: the hotel’s touchscreen version wouldn’t survive outdoors, weather, or mittens
- Works in nighttime yard lighting, or at least doesn’t fall apart the moment the sun goes down
- Wi-Fi upload so guests can take their photos home immediately: no cables, no accounts, no typing
- Seasonal theming that works for both Halloween and Christmas: frames, accessories, and attract screens that feel like the display
The Hardware
The whole system runs on a Raspberry Pi 4B. I already had one sitting on the workbench from another project, so it became the natural choice. It’s definitely overkill for simply snapping pictures, but it turns out to be the right kind of overkill here, with enough CPU to run MediaPipe face detection without hesitation, a hardware-accelerated camera stack via libcamera, built-in Wi-Fi for the upload side, and GPIO for buttons and relay control. Nothing in the processing pipeline feels laggy, and the user experience stays smooth, which matters when excited kids are punching a glowing START button like it’s launching Santa’s sleigh.
The enclosure is a Bud Industries PN-1343-AC polycarbonate box. I wanted something that looked intentional rather than “temporary project box duct-taped to a post.” Polycarbonate is durable, easy to drill and cut, and weathers well. Everything but the relay, external light, and lit buttons is housed in the enclosure (i.e. the display, buttons, camera ribbon, and power).
| Part | Notes |
|---|---|
| Raspberry Pi 4B (4GB) | The brains. 4GB recommended, since running camera, OpenCV, and MediaPipe simultaneously eats memory. |
| Pi Camera Module 3 Wide | 12MP Sony IMX708 sensor. The Wide variant is important for groups and side-by-side families. |
| 10.1″ HDMI display (1024×600) | The screen guests look at. Weather-resistant enclosure or cover required for outdoor use. |
| Bud Industries PN-1343-AC enclosure | Polycarbonate project box. Sturdy, clean-looking, easy to modify. |
| START + NEXT illuminated buttons | Two momentary pushbuttons. Big and lit so guests can actually find them. START begins the sequence or resets to intro; NEXT cycles through results. |
| 2-channel optocoupled relay module | Switches the photo-zone lighting under software control. Teyleten 3.3V Songle relay works well here. |
| 256GB microSD | OS card. Photo writes are confined to /data directories to minimize corruption risk from power loss. (can get away with a smaller card) |
| 5V / 5A USB power supply | Don’t cheap out. Camera + display + processing under load draws more than you’d think. |

3D Printed Parts
I designed three 3D printed parts for this build, and the STL files are available below if you want to recreate any of them.
The first two parts work together as a single visual treatment for the screen and camera area. The bezel mounts on the inside of the enclosure against the clear acrylic front window. It holds the Camera Module 3 Wide and the LCD screen in a fixed alignment, keeps the lens centered, and blocks glare from the side illumination bouncing around inside the box. The matching set of side baffles are thin black panels that block the viewing angles into the enclosure from the sides. Together they solve a cosmetic problem: the acrylic window looked nice from the front, but at certain angles you could see straight through to the circuit boards and wiring. Not a great look. The bezel and baffles clean that up, and the camera mounts through a hole below the screen with all the wiring running behind everything out of sight.
Between the two of them, the station went from looking like a Pi taped in a box to something that looks (mostly) purpose-built and finished.
The third printed part is a mount for the top of a 4×4 PVC post cover that holds the 120V AC lawn spotlight used for the photo-zone lighting. More on that in the Lighting section below.
The Lighting
The relay-controlled lighting is less about decoration and more about making the pictures actually work. The software turns the light on when the preview and countdown start, keeps it on through capture, and turns it off during processing and review.
That sounds minor, but it matters a lot. The yard display provides plenty of ambient light, but not always where you need it. A dedicated flood or ring light during the photo sequence gives MediaPipe and the camera a fighting chance against dark spots and the mixed color temperatures that holiday lighting produces.
For the light itself I used a 120V AC lawn spotlight mounted on a 3D printed bracket that sits on top of a 4×4 PVC post cover (the same kind of post cover you’d use for a mailbox or fence post). It aims the beam directly at the photo zone from above. The STL for that mount is included in the downloads below if you want to use the same setup. It’s a simple part but it keeps the spotlight aimed correctly and stops it from rotating or drooping over a season of outdoor use.
The AC relay keeps the Pi completely out of the high-voltage side of the circuit. A GPIO pin (BCM 22) tells the relay what to do; the relay handles the actual load. That is a lot better than trying to ask a Pi pin to switch something it was never designed to switch (and blowing up your Pi).
The Camera
I started with the standard Raspberry Pi Camera Module 3 (same sensor, same autofocus system, just the normal field of view). This quickly became an issue with framing. With families crowding in together, the standard FOV was too tight: tall people would get clipped, wide groups might have to step back into the street to fit, etc. Not great.
Switching to the Camera Module 3 Wide solved that. The wider field of view lets groups fit without retreating, and the autofocus is more reliable when it isn’t being forced to the extreme near edge of its range. The Wide variant uses the same Sony IMX708 sensor and the same phase-detection autofocus system, so everything else about the software side stayed the same.
But there was still a focus problem, and it turned out to be partly mechanical.
The Autofocus Rabbit Hole
Even after switching to the Wide, focus still wasn’t solved. And this is where it gets a little embarrassing, because I spent over a week chasing what I thought was a software problem that turned out to be half mechanical.
The mechanical issue took the longest to find: the camera PCB was mounted flush against the inside of the enclosure’s acrylic window. The tiny movements the Camera Module 3’s autofocus actuator makes were bumping directly into the glass and disturbing the camera’s focus. Not visible to the eye, but enough to throw focus off at the moment of capture.
The fix for the mechanical problem was simple once I found it: a few rubber washers between the camera PCB and the bezel, so the camera has a few millimeters of breathing room and isn’t physically coupled to the enclosure. If you’re mounting this camera behind glass or acrylic, don’t skip that step.
The software fix was switching to fixed manual focus entirely. The lens is set to 0.75 dioptres (roughly 1.3 meters), which covers multiple people standing at a normal selfie-taking distance. That position is locked in at startup and re-forced right before every capture, because the preview and still-capture paths do not always behave like one continuous camera operation. Not as elegant as “let autofocus figure it out,” but dramatically more predictable for a kiosk where people are standing in roughly the same spot every time.
0.75 puts sharp focus at about 1.3m, good for most selfie scenarios. Set MF_ENABLE = True and tune MF_OVERRIDE_POS for your specific photo zone distance.The Software
Everything runs through a single Python script, selfieStation.py. I chose Python because the libraries I needed (Picamera2 for the camera, MediaPipe for face detection, Pillow for image handling, and OpenCV for the live preview UI) all have strong Python support. If you’re coming from an Arduino background, running Python (or anything really) on a Pi is a different world: real OS, real multithreading, huge library ecosystem, and a lot more ways to build something that “almost works.”
The overall structure is a finite state machine; the program is always in exactly one state, and button presses or timeouts move it to the next:
Where each state is responsible for:
- INTRO: attract screen, waits for any button press
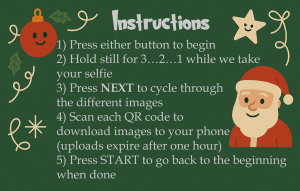
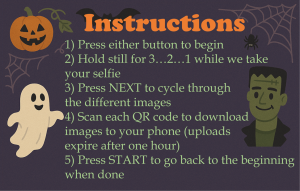
- INSTRUCTIONS: explains how to use the station, 60-second timeout back to intro
- PREVIEW: live mirrored view with a 3-2-1 countdown, then capture
- PROCESSING: animated sparkles screen while the photo gets framed and the accessory variants are generated
- REVIEW: slideshow of the three results with QR codes, NEXT button cycles through them
Getting the timing right between those states took a lot of iteration. Early versions blocked the UI during processing, which made the station feel broken even when it was technically working fine. The fix was moving the expensive work into background threads so the animated processing screen plays while images are being generated. The wait didn’t get shorter, but it stopped feeling broken.
There are also a bunch of kiosk-life details that aren’t exciting but matter enormously in the real world: debounced physical buttons, a long-press START (hold 1.5 seconds) that forces a hard reset to the intro screen, rotating logs, disk-space monitoring, and startup purging for old sessions.
One detail worth calling out specifically: the live preview is mirrored. Without that, when guests move to their right, they’d see themselves move to the left on screen, and it gets confusing fast (especially for kids). Mirroring the preview makes it feel like a normal mirror, so movements line up with what people expect. But because the themed frame has cutouts around the perimeter that guests are trying to position themselves around, the frame had to be mirrored too during the preview, otherwise the cutouts would be on the wrong side relative to the mirrored person. Once the photo is captured, everything gets flipped back so the final saved image reads correctly. It’s a small thing, but the station felt much more natural to use after I added it.
Switching themes is just a command-line flag:
python3 selfieStation.py --theme christmas
python3 selfieStation.py --theme halloween
The Frames and Accessories: What Makes It Feel Finished

Each theme gets two accessory variants as well as a non-accessory picture so guests can cycle through with the NEXT button and pick their favorite to download (images are downloaded individually). Christmas gets a Santa hat and reindeer antlers. Halloween gets a witch hat and cat ears.


One detail worth knowing if you’re building your own overlays: the accessory images are easiest to work with when they are prepared around the same output geometry as the final frame, rather than treated like random little sticker files. The landmark math works relative to the full image, so keeping the assets tied to the final output dimensions avoids a lot of coordinate headaches.
Each session produces three files:
toozFamilyChristmas_YYYYMMDD_HHMMSS_0.jpg   # Original (no accessory, in frame)
toozFamilyChristmas_YYYYMMDD_HHMMSS_1.jpg   # Accessory variant 1
toozFamilyChristmas_YYYYMMDD_HHMMSS_2.jpg   # Accessory variant 2
Sharing the Photos
A selfie station that traps photos on a Raspberry Pi is only half the idea. Guests need to actually take something home. After the images are generated, the station uploads them when internet is available and shows a QR code on the review screen for each one. Scan it with your phone camera, save the photo. No app, no account, nothing to install.
The hotel’s version let users type in a phone number or email address to have the photos sent directly. We thought doing that and decided against it for two reasons. First, we weren’t going to have a touchscreen, and a physical keyboard sitting outside in December sounded miserable. Second, and this is the more honest reason, we weren’t super-keen on setting up a mail server and having some nefarious elf send inappropriate images from “us” to a random stranger. We can’t really control what people do with the photos after the fact, but at least it’s not coming directly from us.
The uploads are temporary, which is why the instruction screen warns guests that links expire after an hour. That’s fine for a holiday display, but it’s not an archive. If you want longer retention, the upload piece is easy to swap out for your own server, an S3 bucket, or Google Drive; the code has a clean seam for it. There’s also a real-world reason you might want to swap it out, which I’ll get to near the end of this writeup.
If the network is down the station doesn’t care. Every session is saved locally under /opt/selfieStation/data/, and a disk-space check at runtime skips uploading rather than crashing if storage gets low. Nobody loses their photo because Wi-Fi had a bad night.
GPIO Wiring
For anyone wiring this up from scratch, the full pin layout using BCM numbering:
| Function | BCM GPIO | Notes |
|---|---|---|
| START button | 17 | Internal pull-up. Active LOW. Long-press ≥1.5s forces reset to intro screen. |
| NEXT button | 27 | Internal pull-up. Active LOW. Cycles images during review. |
| Relay / light | 22 | Active HIGH. Starts LOW. Goes HIGH during preview and capture only. |
The buttons use the Pi’s internal pull-ups, so the wiring is just button-to-ground without extra resistors. GPIO is optional, since the script falls back to keyboard if no hardware is detected (Enter = START, Space or N = NEXT, Q or Esc = quit). That makes it easy to develop and test without the full physical build in front of you.
Setting Up the Pi
If you’ve never set up a Raspberry Pi from scratch, the good news is that the official tooling has gotten really friendly. Here’s the full walkthrough for what I used.
1. The OS
I’m running Raspberry Pi OS Bookworm (64-bit), which is Debian 12 under the hood. Bookworm matters specifically because of the camera stack: it’s the first Pi OS release that ships with libcamera as the default and Picamera2 as the modern Python interface. The older raspistill and the original picamera library were deprecated in this transition. If you find a tutorial online that uses either of those, it’s almost certainly out of date.
Use the official Raspberry Pi Imager to flash a card. Pick “Raspberry Pi OS (64-bit)” and let the imager set the hostname, user, Wi-Fi, and SSH keys for you in the advanced options. Saves a lot of headache compared to doing all that after first boot.
2. Enable the Camera and Bump the GPU Memory
Run sudo raspi-config and make two changes:
- Interface Options > Camera: enable the camera if it’s not already on. On Bookworm this is usually on by default, but it’s worth checking.
- Performance Options > GPU Memory: set this to 128MB. The default is lower, and if you leave it there the live preview can stutter or fail to start. Bumping the GPU memory split gives the camera and video pipeline enough headroom to feel smooth.
Reboot after making those changes.
3. Install the System Packages
These are installed via apt (the Debian package manager) because they have native compiled bits that you really want from the system rather than from pip:
sudo apt update
sudo apt install -y python3-picamera2 python3-opencv python3-pip git unclutter
A quick note on what each one does:
python3-picamera2: the Python bindings for libcamera, including all the camera control plumbingpython3-opencv: OpenCV, used for the live preview window, image compositing, and the white-flash capture confirmationpython3-pip: lets you install the Python-only packages in the next stepgit: for cloning the repounclutter: hides the mouse cursor when it’s idle, which matters for a kiosk where you don’t want a stray cursor sitting in the middle of the screen
4. Install the Python Packages
pip install "mediapipe==0.10.*" "qrcode[pil]" requests pillow
The MediaPipe version pin matters. The 0.10 series is the last one with reliable ARM/Pi support; newer versions have moved to a different distribution model that’s less plug-and-play on a Pi. Pinning to 0.10.* avoids surprise upgrades that break things.
5. Add Yourself to the Right Groups
sudo usermod -aG video,render,gpio $USER
# reboot required after this
The video and render groups are needed for camera access (the user running the script has to be allowed to talk to the camera hardware), and gpio is needed for direct GPIO access for the buttons and relay. Without these you’ll get cryptic permission errors when the script tries to open the camera or read a button. Reboot after running this so the group changes take effect.
6. Clone and Run
cd /opt
sudo git clone <your-repo-url> selfieStation
sudo chown -R $USER:$USER selfieStation
cd selfieStation
python3 selfieStation.py --theme christmas
If everything is set up correctly, you should see the attract screen come up in fullscreen. Press Enter on your keyboard (or the START button if you’ve wired one up) to begin a session.
raspi-config and rebooted afterward. You can confirm libcamera sees the camera by running libcamera-hello --list-cameras at the terminal. If that command shows your Camera Module 3, the hardware side is fine and the issue is on the Python side; if it doesn’t, the camera or its ribbon cable is the suspect./opt/selfieStation/selfieStation.py/opt/selfieStation/frames/{theme}_frame_16x9.png/opt/selfieStation/accessories/{theme}_1.png, {theme}_2.png/opt/selfieStation/assets/screens/{theme}_intro.png, {theme}_instructions.png/opt/selfieStation/data/ (photos, sessions, logs, stats.json)Once you’ve confirmed it runs by hand, set up the systemd service from below so it starts automatically on every boot.
Autostart with systemd
For this to work automagically it has to start itself when you plug it in. On Linux that’s systemd, the init system that manages background services on the OS. Drop the service file at /etc/systemd/system/selfieStation.service:
[Unit]
Description=Selfie Station
After=graphical.target
Wants=graphical.target
StartLimitIntervalSec=60
StartLimitBurst=10

[Service]
User=<yourUserName>
Group=<yourUserGroup>
WorkingDirectory=/opt/selfieStation
ExecStartPre=/usr/bin/install -d -m 750 -o <yourUserName> -g <yourUserGroup> /dev/shm/selfieStation
ExecStart=/usr/bin/python3 /opt/selfieStation/selfieStation.py \
    --theme christmas --purge-all --purge-older 72
Restart=always
RestartSec=2

[Install]
WantedBy=graphical.target
Note: replace <yourUserName> and <yourUserGroup> with your username and group in the above script.
Then enable it:
sudo systemctl daemon-reload
sudo systemctl enable --now selfieStation.service
The --purge-all --purge-older 72 flags clean up sessions older than 72 hours every time the station starts, which is important for a kiosk that runs every night without anyone managing disk space manually. Restart=always means if the script crashes for any reason, systemd brings it back in two seconds. For something running unattended outdoors all night, that’s the difference between “it just works” and “I’m walking across the yard in the cold to reboot a Pi.”
Downloads
The main pieces of the build are linked below: the Python source, the systemd service file, and the three STL files for the 3D printed parts.
- 📄 selfieStation.py, full source code
- 📄 selfieStation.service, systemd service file
- 🖨️ screen-bezel.stl, inside-enclosure bezel with camera mount hole (coming soon)
- 🖨️ side-baffles.stl, matte-black panels that block side view angles into the enclosure (coming soon)
- 🖨️ spotlight-post-mount.stl, 4×4 PVC post cover spotlight bracket (coming soon)
python3-picamera2, python3-opencv (via apt) ·mediapipe==0.10.*, qrcode[pil], requests, pillow (via pip)What Worked and What Didn’t
What Worked
- Scrapping PiBooth and owning the full pipeline; once I stopped fighting the framework, things moved fast
- Fixed manual focus dialed in for the photo zone, dramatically more consistent than continuous AF
- Relay-controlled light during preview and capture, which makes a real difference at night
- Full themed frame compositing, feels like a finished photo, not a webcam grab
- QR code sharing: instant, everyone knows how to use it, no app required
- The two-button interface; kids figure it out immediately
- Local session saves when network is unavailable, so nobody loses their photo
- systemd auto-restart, the kind of boring reliability piece that keeps me from walking across the yard to reboot a Pi
What Didn’t
- Continuous autofocus: seemed obviously right, turned out to be the wrong call for a kiosk
- Blocking the UI during image processing: made the station feel broken even when it worked
- Relying entirely on ambient yard lighting; inconsistent results, especially later at night
- Trying to extend PiBooth past its limits: classic sunk cost trap
- No visible indicator pointing at the camera; guests often weren’t sure where to actually look during the countdown
What I’d Do Differently
The biggest thing on the list for next year is a small arrow or “look here” label on the bezel pointing at the camera. A surprising number of guests had trouble figuring out exactly where to look when the countdown started. The camera is below the screen, and once people are watching themselves on the live preview, it’s not obvious that the actual lens is somewhere else. A dedicated indicator right next to the camera opening should solve it without changing anything in the software.
A Heads-Up if You Build Your Own
The page above describes the temporary file-share approach that’s in the code and that the instruction screens reference, because that’s what most people will start with and it’s the simplest path to working. But there’s a real-world lesson worth knowing before you deploy yours.
I started the season with that setup. It worked great in testing. A few weeks in, I started getting reports that some phones could download their photos and others couldn’t. Same QR code, same network, different result. After some debugging in the field, the issue turned out to be on the carrier side: a few of the major mobile carriers were blocking traffic to the file-share host I was using, probably as part of broader anti-spam or anti-malware filtering. Not something I could fix from my end.
The fix was switching the upload backend over to Google Drive. From the guest’s perspective nothing changed (scan the QR code, tap, save), but Google Drive links don’t get filtered out by anyone’s carrier, and the photos are easier to manage on the back end too.
Setting up Pi-to-Drive authentication is its own small project (service accounts, OAuth, scopes, etc.) and isn’t covered here, so YMMV depending on which carriers your guests are on. If you build this and start hearing “the QR code didn’t work for me” from some folks but not others, the carrier-filtering issue is the first place I’d look, and Google Drive is the easiest fix I found.
Wrapping Up
Could I have kept patching PiBooth? Probably. Would it have been as satisfying? No.
Owning the whole pipeline (buttons, camera, framing, overlays, sharing, cleanup, and the boring reliability pieces) means I can fix anything, improve anything, and know exactly what the system is doing at 8pm on Christmas Eve when there’s a line of neighbors waiting. That’s worth the extra build time.
The response from families has been great! People who stopped by last year specifically bring family members over to try it. There’s something a little silly and a little magical about watching a Santa hat land on your head, and the QR code makes the whole thing feel finished. I’ll keep iterating (better upload hosting, better lighting, maybe a printer someday), but even as it sits right now, it’s one of my favorite builds.